Quick Start
Overview
Cartesi is an application-specific rollups technology that allows developers to build powerful decentralized rollups applications using any programming language or library (as long as it compiles to RISC-V). It does that by running the application inside a powerful virtual machine, the Cartesi VM, that can run an entire Linux OS.
Deroll is a collection of TypeScript libraries that helps developers to build Cartesi applications, by introducing a framework and concepts familiar to TypeScript developers.
Installation
Before you start building you need to setup the Cartesi development environment:
- Install Docker Desktop on Mac, Linux or Windows with WSL2.
- Install the Cartesi CLI
npm install -g @cartesi/cliIf you have any issues, please refer to the official installation guide for more information.
Create a project
Execute the command below to create a new deroll application. It will guide you through some project options.
$ pnpm create @deroll/appIf you select the default options (no wallet or router library, more on that later), you will get the following src/index.ts file.
import { createApp } from "@deroll/app";
// create application
const app = createApp({ url: "http://localhost:5004" });
// log incoming advance request
app.addAdvanceHandler(async ({ metadata, payload }) => {
console.log({ metadata, payload });
return "accept";
});
// log incoming inspect request
app.addInspectHandler(async ({ payload }) => {
console.log(payload);
});
// start app
app.start().catch((e) => process.exit(1));This application reads inputs (requests) from an HTTP server running at port 5004 inside the Cartesi machine, and only prints those inputs to the console.
Build Cartesi Machine
The next step is to build the application Cartesi Machine, by using the cartesi build command.
That will start a build process powered by Docker, and create a Cartesi Machine that is stored in the .cartesi directory.
You should see the Cartesi Machine booting and showing the output below:
$ cartesi build
.
/ \
/ \
\---/---\ /----\
\ X \
\----/ \---/---\
\ / CARTESI
\ / MACHINE
'
[INFO rollup_http_server] starting http dispatcher service...
[INFO rollup_http_server::http_service] starting http dispatcher http service!
[INFO actix_server::builder] starting 1 workers
[INFO actix_server::server] Actix runtime found; starting in Actix runtime
[INFO rollup_http_server::dapp_process] starting dapp: node index.js
Manual yield rx-accepted (0x100000000 data)
Cycles: 912099534
912099534: 09125a4ff02d0e8d095ab102189318698c71aafe5469f9fddd004b8d44c0ee0e
Storing machine: please waitRun Cartesi Node
Now that you built a Cartesi Machine you can run a Cartesi Node with that machine with the cartesi run command, which should produce the following output:
$ cartesi run
prompt-1 | Anvil running at http://localhost:8545
prompt-1 | GraphQL running at http://localhost:8080/graphql
prompt-1 | Inspect running at http://localhost:8080/inspect/
prompt-1 | Explorer running at http://localhost:8080/explorer/
prompt-1 | Bundler running at http://localhost:8080/bundler/rpc
prompt-1 | Paymaster running at http://localhost:8080/paymaster/
prompt-1 | Press Ctrl+C to stop the nodeThis will run a few services on your machine:
-
an anvil instance running at http://localhost:8545 which contains all Cartesi infrastructure smart contracts deployed to it, and also a few test contracts. You can see the addresses of these contracts by executing the
cartesi address-bookcommand. -
a GraphQL server running at http://localhost:8080/graphql which you can use to query outputs produced by your application. It has a playground UI as well.
-
an inspect server running at http://localhost:8080/inspect/ which you can use to simulate an input, or query read-only computations from your application.
-
an explorer server running at http://localhost:8080/explorer/ which is a Web Application that you can use to view inputs and outputs, and also send inputs to your application.
-
an ERC-4337 bundler server running at http://localhost:8080/bundler/rpc which you can use to implement ERC-4337 support in your application.
-
an ERC-4337 paymaster server running at http://localhost:8080/paymaster/ which you can use to implement ERC-4337 gas sponsorship support in your application.
Some of these services will be used below.
Send Input
The first step to interact with your application backend is to send an input to it. Tipically inputs will be sent by your application frontend.
For testing you can send inputs directly to the local anvil instance using the Cartesi smart contracts, or you can use the cartesi send command.
Send input using cartesi send
The cartesi send command will guide you through some steps to send different kinds of inputs, like in the example below where we send a string tuler as the input to the application.
cartesi send
? Select send sub-command Send generic input to the application.
? Chain Foundry
? RPC URL http://127.0.0.1:8545
? Wallet Mnemonic
? Mnemonic test test test test test test test test test test test junk
? Account 0xf39Fd6e51aad88F6F4ce6aB8827279cffFb92266 9999.964983134519619707 ETH
? Application address 0xab7528bb862fb57e8a2bcd567a2e929a0be56a5e
? Input String encoding
? Input (as string) tuler
✔ Input sent: 0x5f5286566a77de72d5b1c21870a250f15a0d0134c1743624aaa6280a9e5ab8dfIf you check in the cartesi run log you will see the output above, which is the result of the console.log(data) of the application code.
Notice that the payload is the hex encoding of the tuler string. More on that on the Data Encoding section.
Send input using cast
First you need to install cast, a swiss-army knife to play with anvil.
Then you can use the cast send command to send inputs to your application through the Cartesi smart contracts.
As an example, to send the tuler string as input, you can use the command below:
cast send \
--private-key 0xac0974bec39a17e36ba4a6b4d238ff944bacb478cbed5efcae784d7bf4f2ff80 \
0x59b22D57D4f067708AB0c00552767405926dc768 \
"addInput(address,bytes)" \
0xab7528bb862fb57e8a2bcd567a2e929a0be56a5e \
$(cast from-utf8 tuler)where:
0xac0974bec39a17e36ba4a6b4d238ff944bacb478cbed5efcae784d7bf4f2ff80is the private key of the first default anvil test account;0x59b22D57D4f067708AB0c00552767405926dc768is the address of the InputBox contract;addInput(address,bytes)is the method to send inputs to the application;0xab7528bb862fb57e8a2bcd567a2e929a0be56a5eis your application smart contract address;$(cast from-utf8 tuler)is the hex encoding of thetulerstring.
Querying GraphQL
The inputs received and outputs produced by your application can be queried using a GraphQL API. Ultimately these GraphQL queries will come from your application front-end, or some intermediate application-specific server. The local node provides a GraphQL Playground interface running at http://localhost:8080/graphql where you can test your queries.
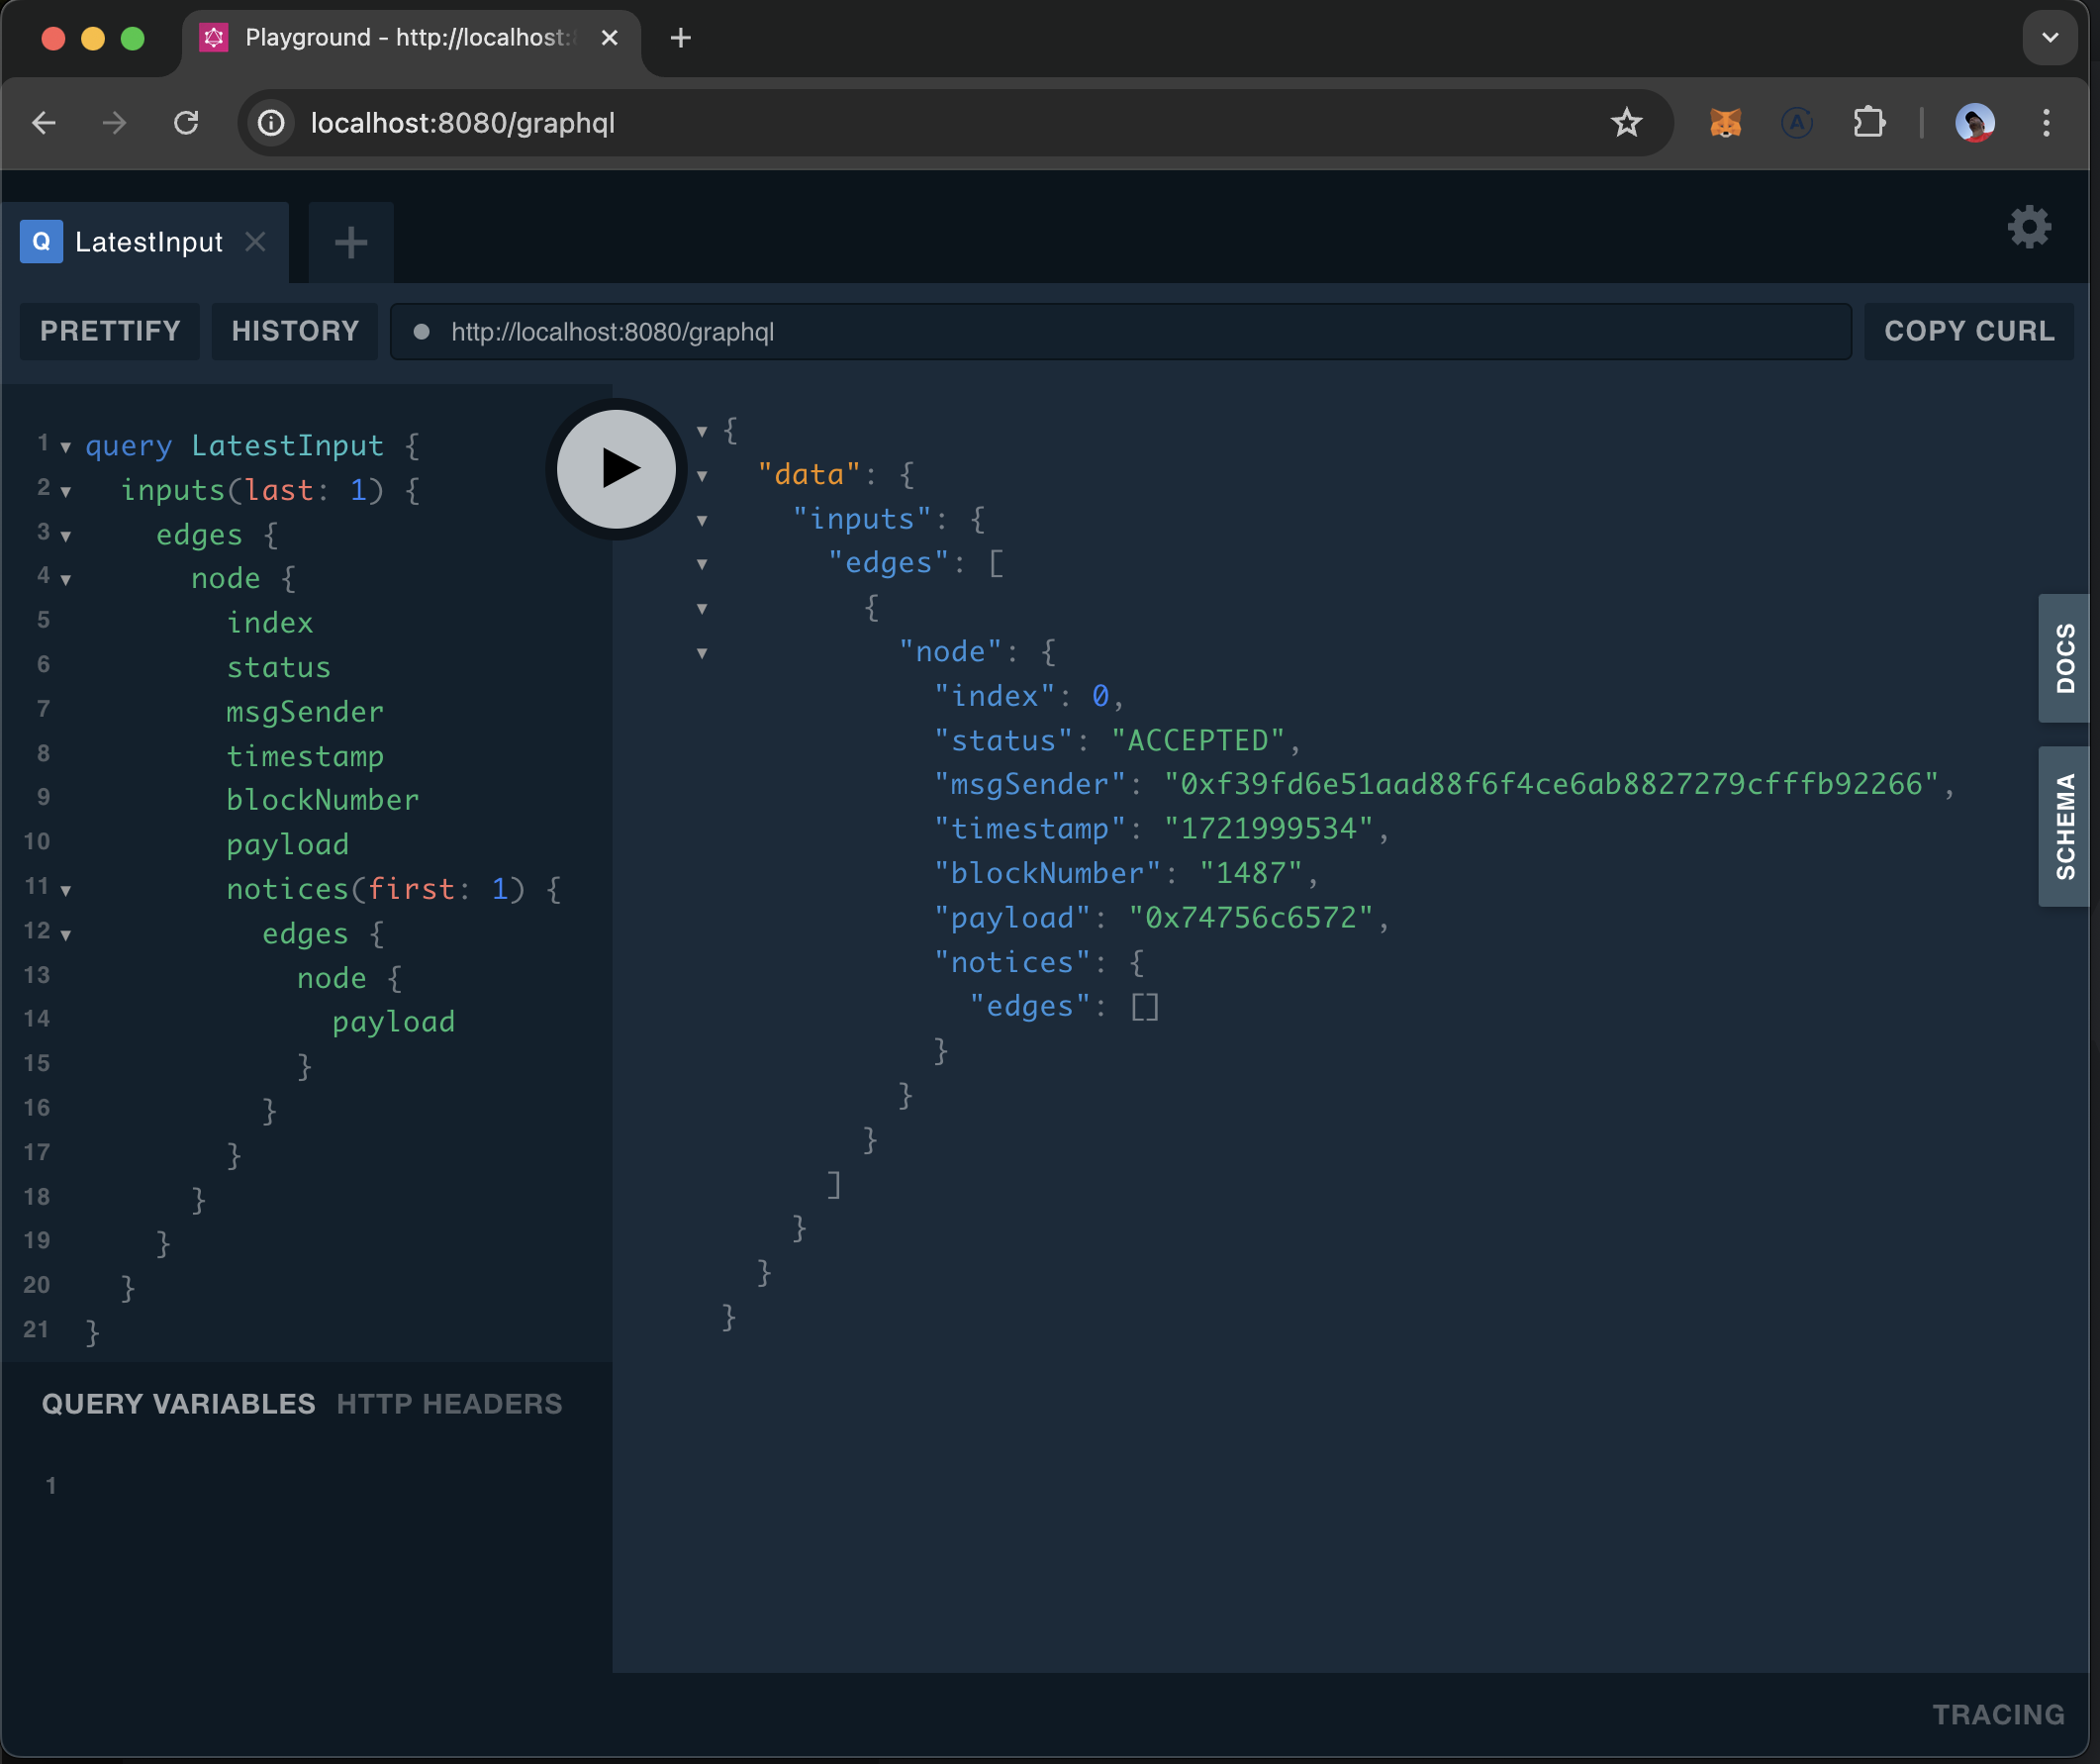
The following example queries the last input received by the application and the first notice of that input.
query LatestInput {
inputs(last: 1) {
edges {
node {
index
status
msgSender
timestamp
blockNumber
payload
notices(first: 1) {
edges {
node {
payload
}
}
}
}
}
}
}For a comprehensive guide on how to use the Cartesi GraphQL API, please refer to the official documentation.
Inspecting State
Inspect state is useful to execute some kind of application logic that does not change the state of the application. This can include an input simulation, or a read-only computation to query internal state of the application.
You can make an inspect call using a tool like curl, like in the example below.
The path is converted to hex encoding and passed as payload to the application.
$ curl -s http://localhost:8080/inspect/tuler
{"status":"Accepted","exception_payload":null,"reports":[],"processed_input_count":1}If you check in the cartesi run log you will see the output above, which is the result of the console.log(data) of the application code.
Inspected state should be returned as report outputs, in this example no reports were produced.
Summary
In this section you learned the basics of the development workflow, creating an application, building it, running in a test environment. In the following sections we will dive deeper into the concepts and features of the deroll framework.